반응형
개발된 앱을 실제 핸드폰에서 테스트 하고 배포하기 위해 iOS 빌드 설정을 정리한다.
> 작성일 : 2025-01-31
> OS : macOS Sequoia 15.2 (Apple M4)
> NodeJS : v22.13.1
> NPM : v10.9.2
> ReactNative : v0.77
> Device : iPhone se2
<1> iOS 의존성 설치 및 Xcode로 프로젝트 오픈
프로젝트 디렉토리에 ios로 이동해 의존성을 설치하고 open 명령을 통해 프로젝트를 Xcode에서 연다.
cd ios
pod install
open {프로젝트명}.xcworkspace
<2> iOS 기기 개발용으로 설정
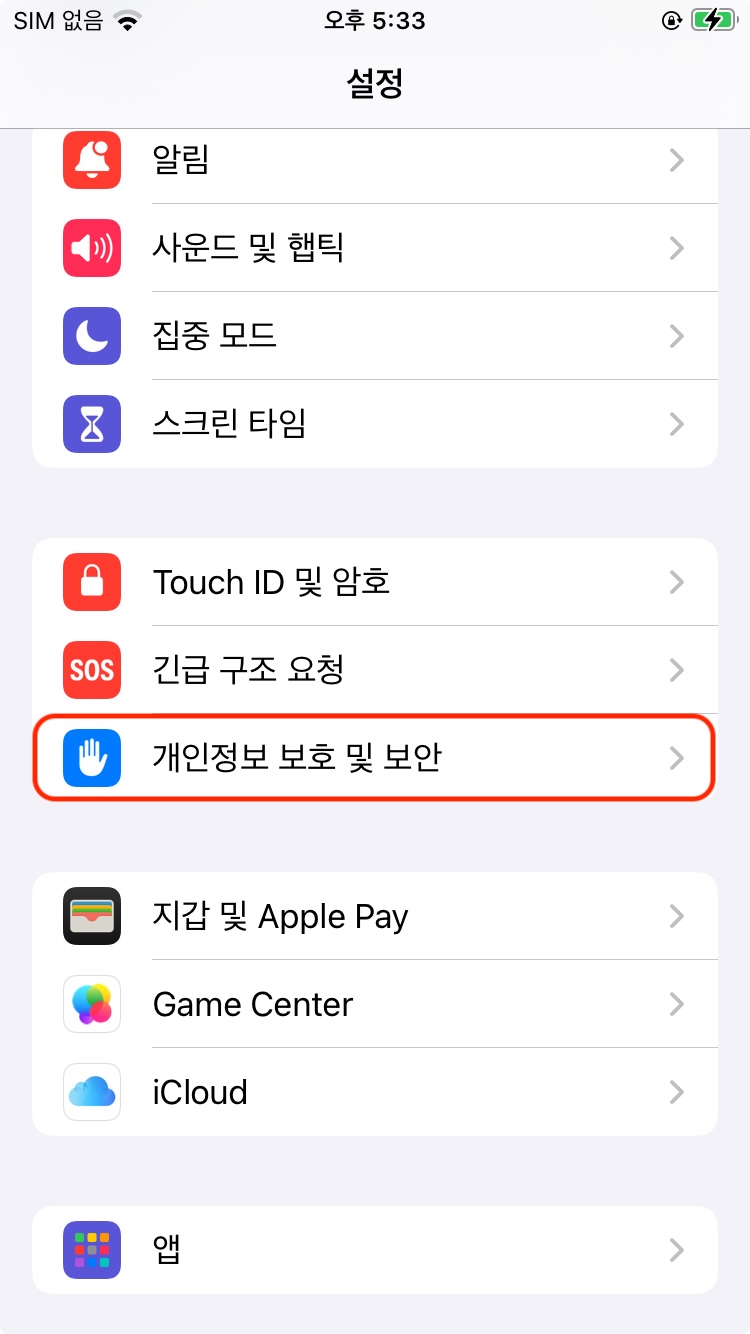
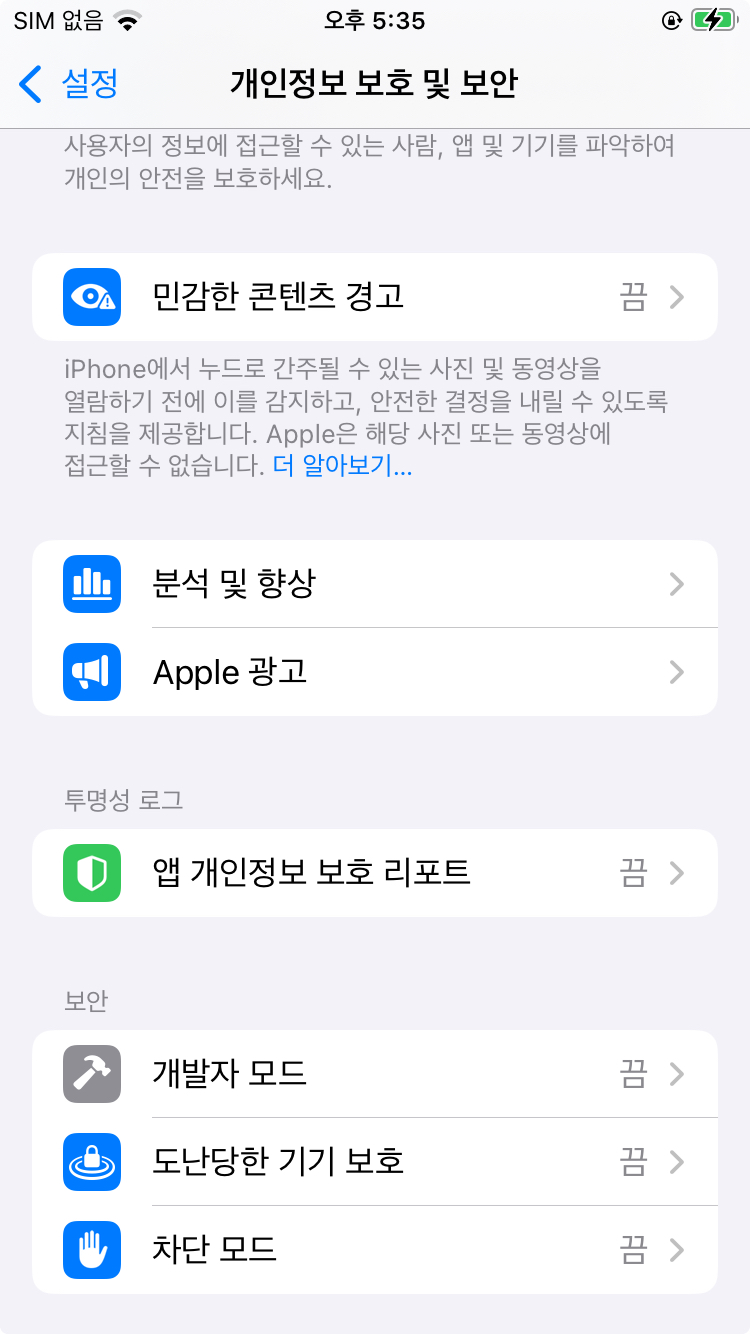
iOS 기기에서 설정 - 개인정보 보호 및 보안 - 개발자 모드 켜기 - 재부팅
처음에는 이부분을 진행하지 않아 디버그 빌드시 아래 에러 발생
opendocs@Opendocsui-Macmini mungpl_app % npm run ios

> mungpl_app@0.0.1 ios
> react-native run-ios

info A dev server is already running for this project on port 8081.
info Found Xcode workspace "mungpl_app.xcworkspace"
info Found booted Leebeom의 iPhone
info Building (using "xcodebuild -workspace mungpl_app.xcworkspace -configuration Debug -scheme mungpl_app -destination id=00008030-00190C892183802E")

info 💡 Tip: Make sure that you have set up your development environment correctly, by running npx react-native doctor. To read more about doctor command visit: https://github.com/react-native-community/cli/blob/main/packages/cli-doctor/README.md#doctor

error Failed to build ios project. "xcodebuild" exited with error code '70'. To debug build logs further, consider building your app with Xcode.app, by opening 'mungpl_app.xcworkspace'.
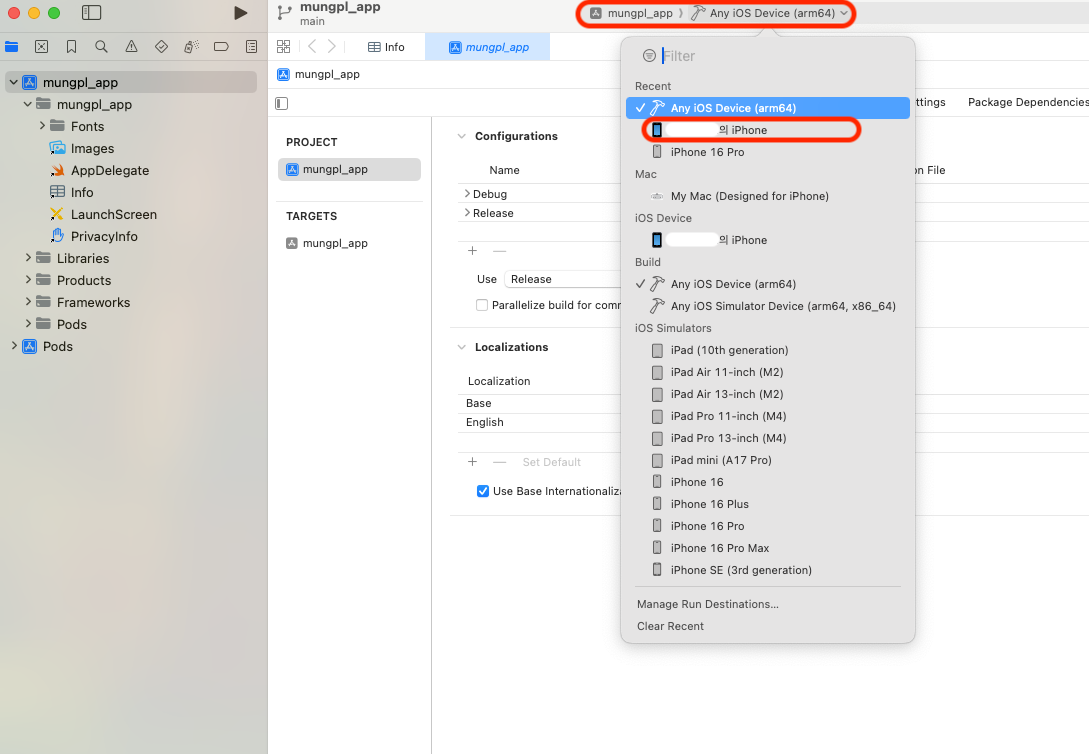
<3> iOS 기기 선택
개발에 사용될 기기를 Mac에 연결하고 Xcode에서 해당 기기를 선택한다.
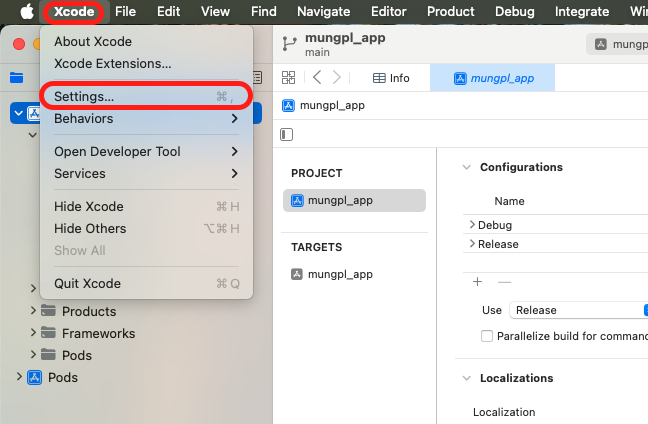
<4> 개발자 계정 설정
계정 추가 및 팀 선택을 진행한다.
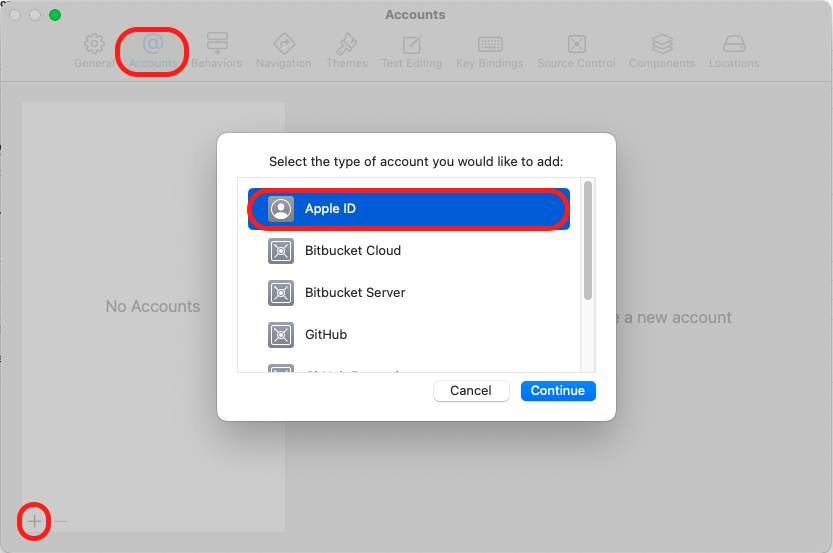
<4-1> Xcode - Settings - Accounts에서 Apple ID 추가
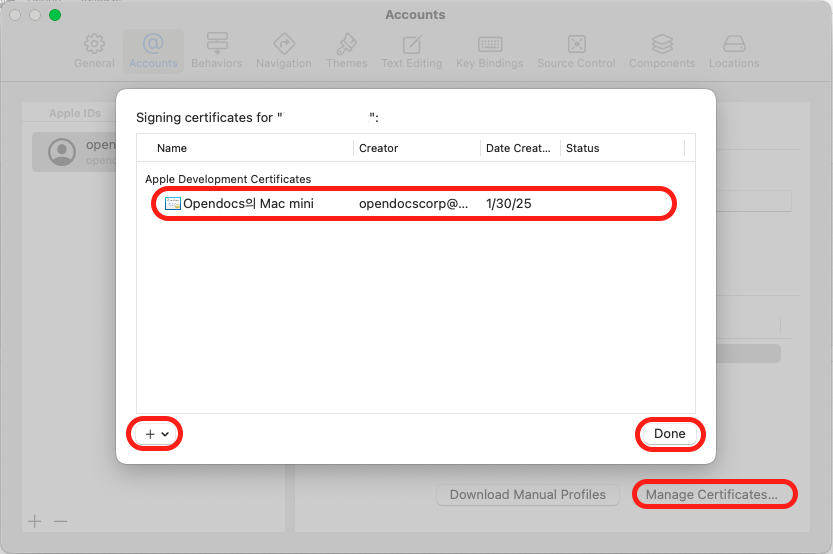
<4-2> 추가된 Personal Team을 선택하고 Manage Certificates... 을 선택해서 Apple Development Certificates 생성
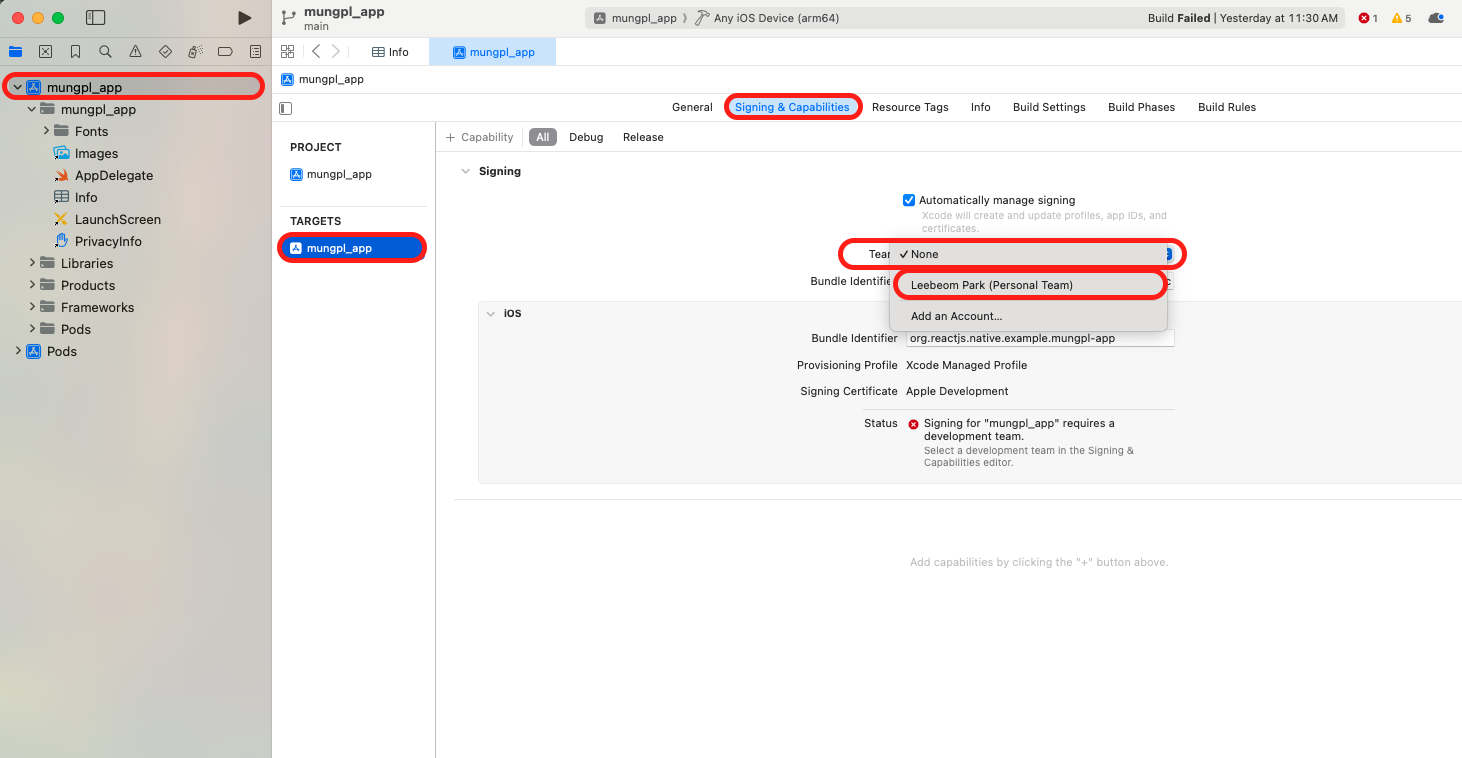
<4-3> 프로젝트 설정의 Signing & Capabilities 탭에서 팀선택
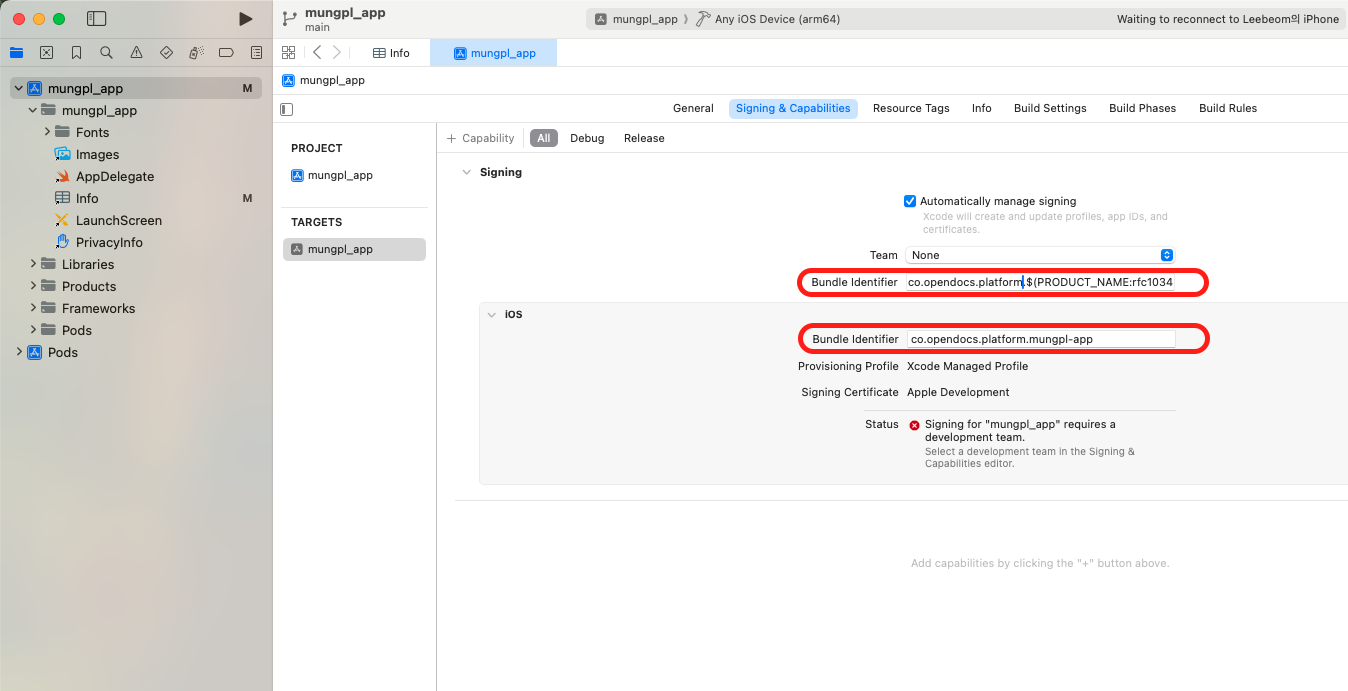
<4-4> 패키지명 설정 : 팀선택 및 첫번째 Bundle Identifier를 입력하면 두번째는 자동 설정 된다.
<5> iOS 빌드
디버그 빌드 / 릴리즈 빌드 방법을 정리한다.
<5-1> 디버그 빌드
기기 연결 & 허용 후 다음 명령을 수행한다.
npm run ios에러 : error Failed to build ios project. "xcodebuild" exited with error code '65'.
# 최 1회는 xcode를 통해 빌드를 진행해야 한다.Xcode 에서 단축키를 통해 빌드한다.
clean 단축키 : Command + Shift + K
build 단축키 : Command + R
키체인 비밀번호를 입력한다. 지정한적이 없다면 그냥 엔터로 넘어간다.
# 최초 설치시 비밀번호를 4번 정도 물어 보는데
# 이게 될지 싶지만 계속 입력하면 Build Success메시지를 볼 수 있다.
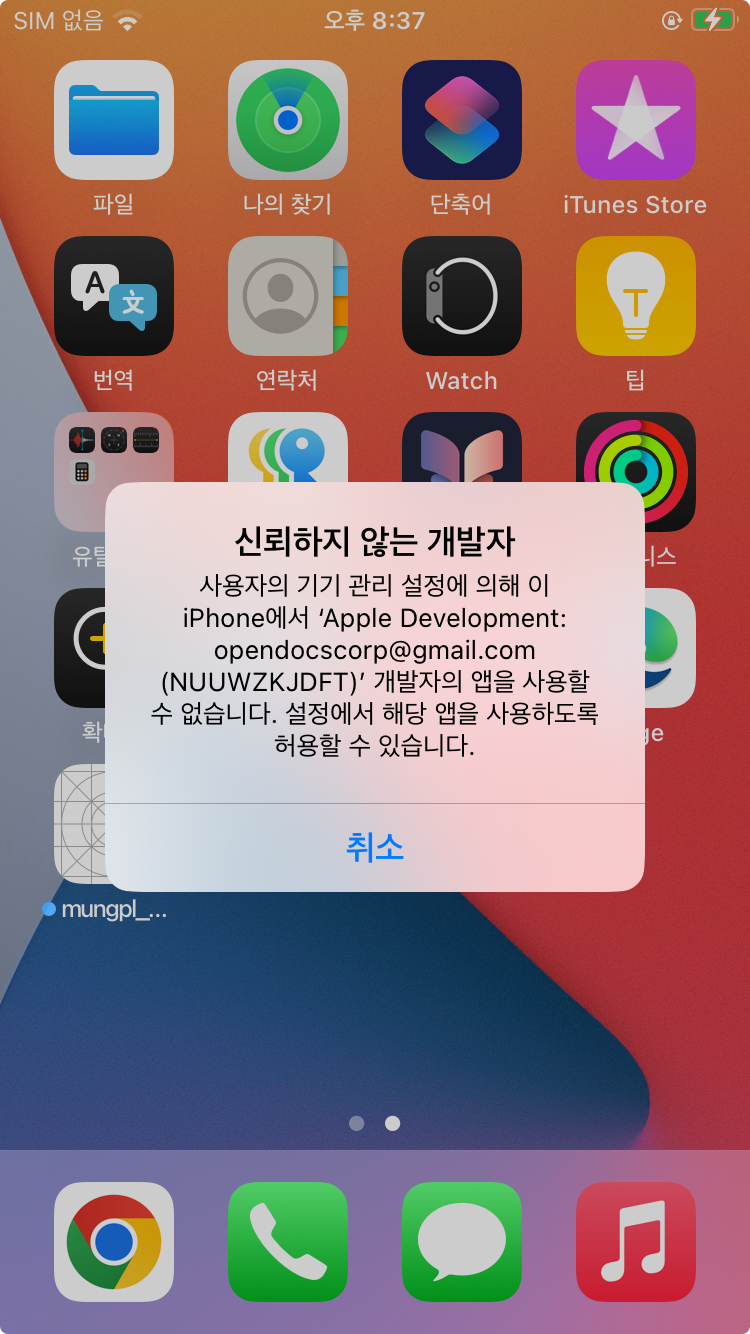
# 이부분을 무시하게 되면 다음 에러 메시지와 마주하게 된다.
/user/bin/codesign ...
... /Frameworks/hermes.framework: errSecInternalComponent
Command PhaseScriptExecution failed with a nonzero exit code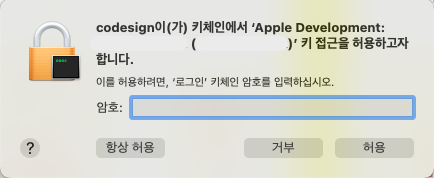
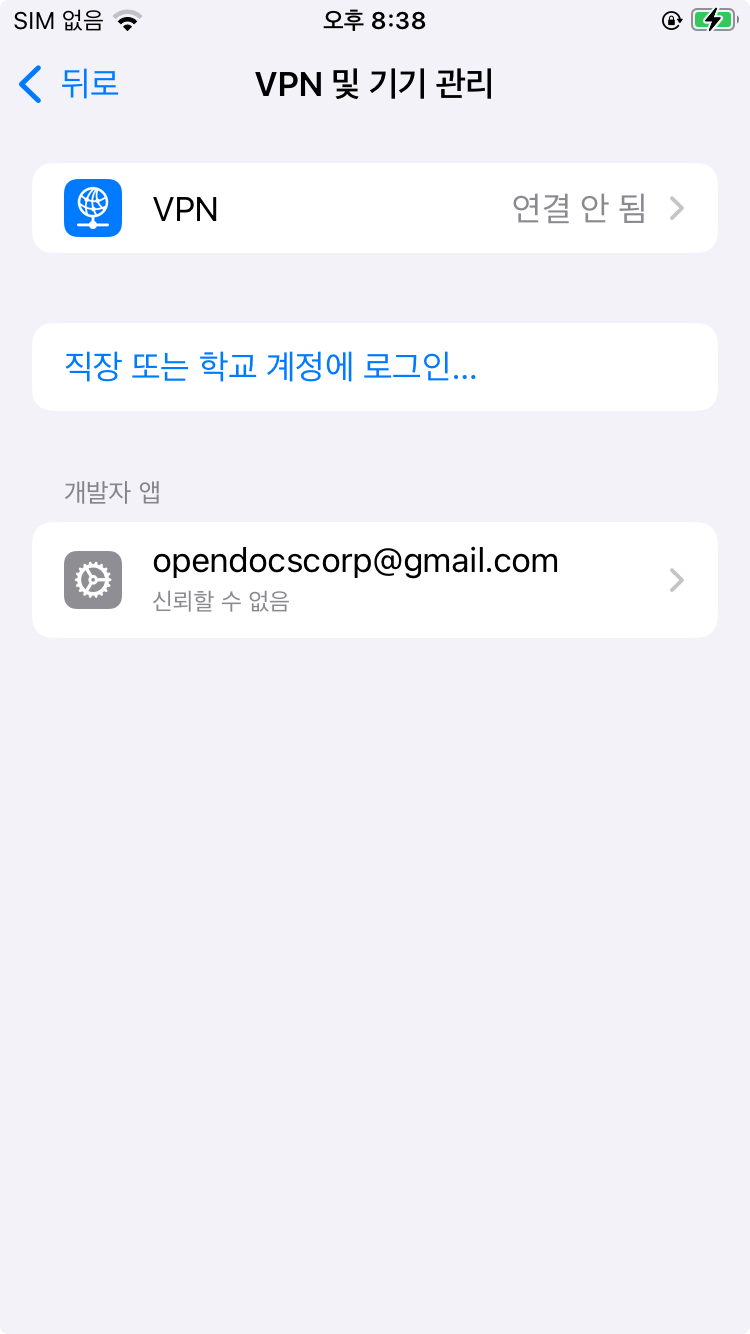
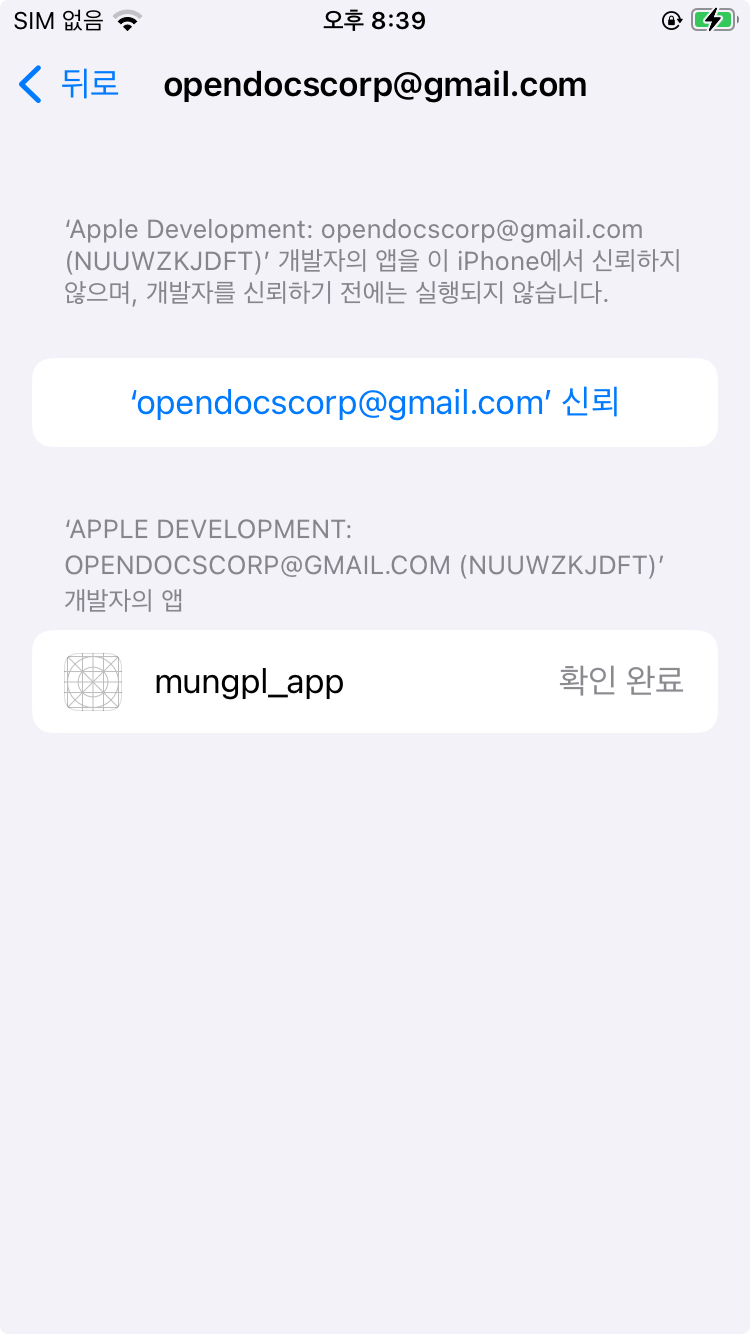
기기에서 신뢰 설정을 해주라는 메시지가 뜬다.
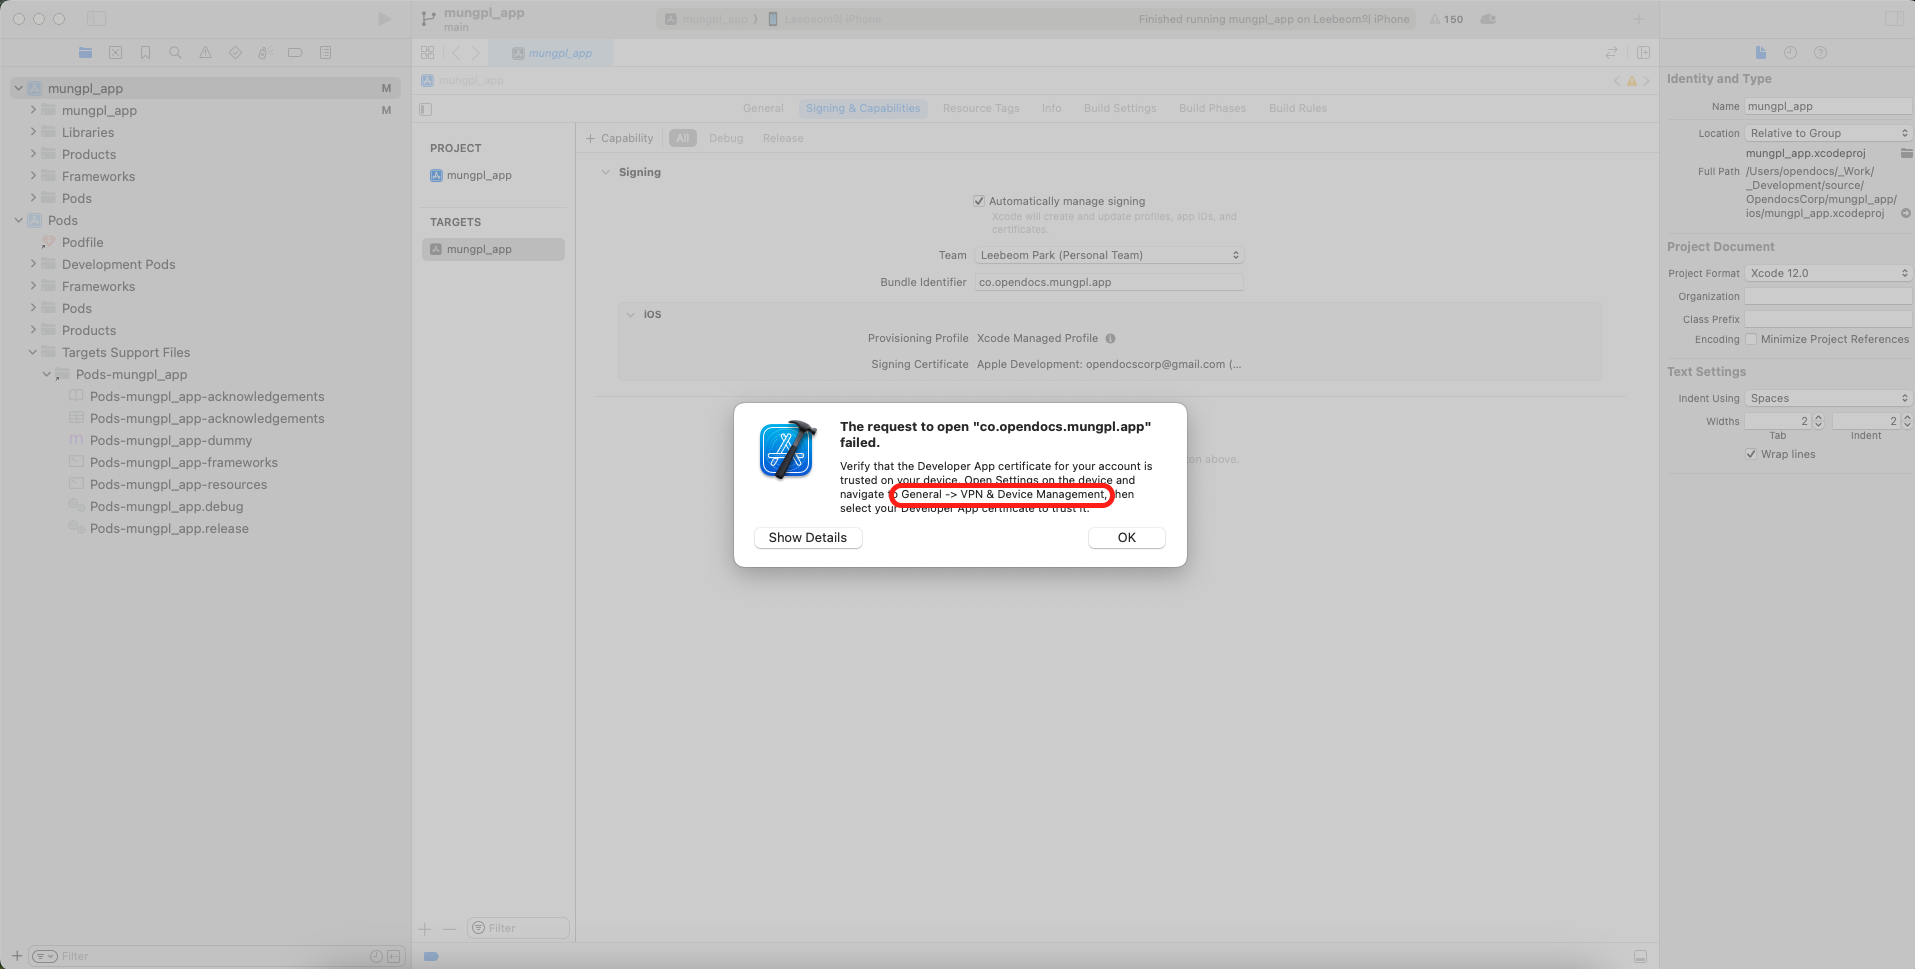
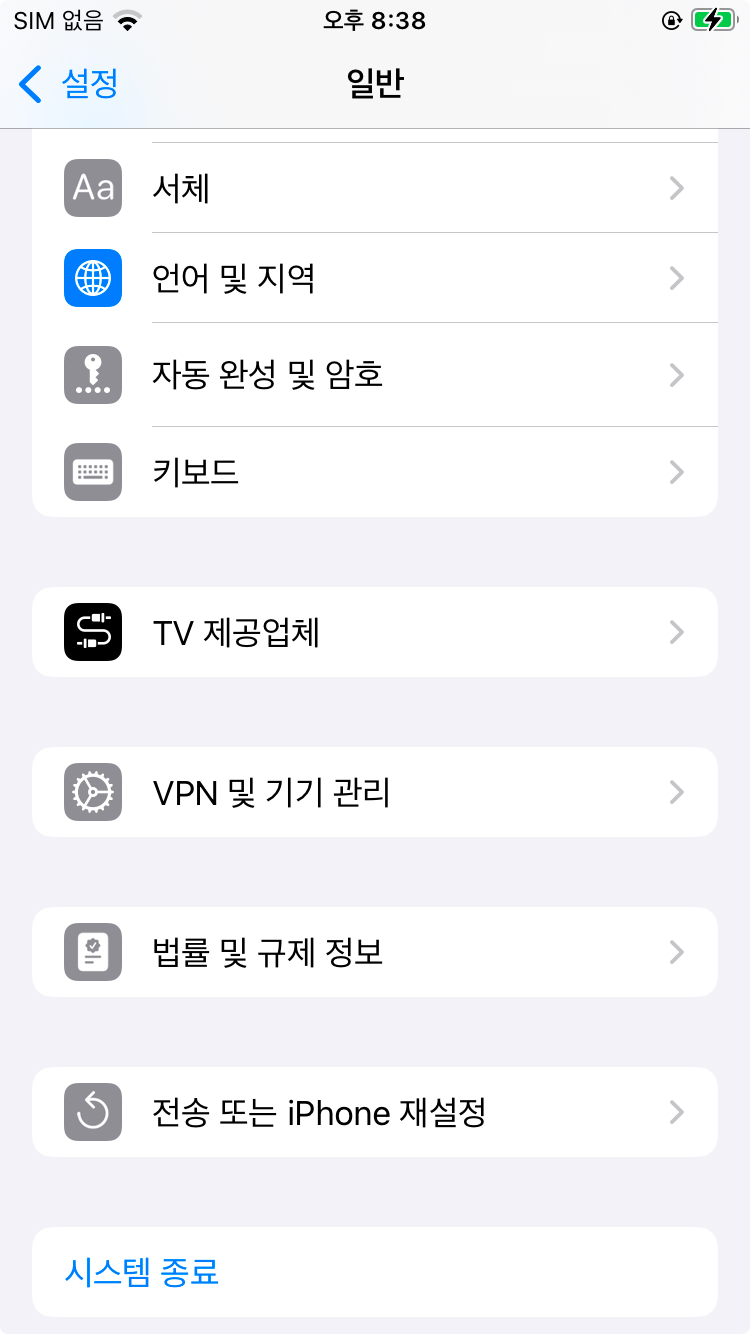
기기에서 설정 - 일반 - VPN 및 기기 관리 - 개발자 앱 (계정선택) - 신뢰 선택을 완료하면 앱이 설치된다.
여러 설정이 연계되어 있어 해결하기 힘든 부분이 많다. 아래는 문제 발생시 시도해 볼수 있는 팁을 정리한다.
# 캐싱된 pod file 제거
cd ~/Library/Developer/Xcode
rm -rf DerivedData
# 프로젝트 폴더에서 수행(Pod 폴더 & lock 파일 제거)
cd ios
rm -rf Pods
rm -rf Podfile.lock
rm -rf build
# 의존성 재설치
pod cache clean --all
pod install
# node_modules 삭제 후 재설치
cd ..
rm -rf node_modules
rm -rf package-lock.json
npm install
# 빌드 재실행
npm run ios
# xcode clean & build
ios/.xcode.env.local 삭제
pod install
npm run ios 또는 xcode - cmd + shift + k (clean) - cmd + r (build)
<5-2> 릴리즈 빌드
릴리즈 빌드의 경우 Apple 개발자 센터에서 연단위 구독 결제가 이루어 져야 하므로 개발준비 단계에서는 생략하고 배포 단계에서 다루도록 한다.
반응형
'Setting' 카테고리의 다른 글
| [Setting | ReactNative] 개발환경 구축하기 (8) - Recoil 적용 (0) | 2025.02.04 |
|---|---|
| [Setting | ReactNative] 개발환경 구축하기 (6) - Android 빌드 (0) | 2025.01.30 |
| [Setting | ReactNative] 개발환경 구축하기 (5) - React Query 적용 (0) | 2025.01.30 |
| [Setting | ReactNative] 개발환경 구축하기 (4) - Icon 적용 (0) | 2025.01.28 |
| [Setting | MacOS] Java (Jdk) Install (0) | 2025.01.27 |